This is my supporting documentation for the #PressEd WordPress conference that I’ll be doing via Twitter on Thursday.

The Topic
Given I’ve been playing around in WordPress since what feels like the dawn of time, I’ve heard lots of people say lots of things about it. I’ve heard it’s too complex. I’ve heard it’s too easy. I’ve been told it won’t allow you to map/GIS information and that it can’t be used for any number of other things. I’ve been told it won’t do things that you can do in this other CMS or that other LMS. As with most things, these boundaries are mostly imaginary and live more in people’s heads than they do in the software itself.
My goal here will be to take you on a tour of what you can do to impact the authoring experience in WordPress. We’ll start by removing complexity from WordPress itself but staying within the typical authoring patterns. We’ll do that in the easiest ways first and then move to more involved interventions. After that, we’ll jump to non-standard authoring patterns and run around seeing where the edges are.
Minimalism/Reducing Complexity
Screen Options
There’s quite a bit of control you have just within the Screen Options settings available to the author. If you can check/uncheck a box these options are available to you. My cautions for anyone doing this with new WordPress users is that it’s easy to forget you simplified things in the beginning and be really puzzled down the line. So if you start people out by simplifying their view, consider revisiting this choice every so often so they can opt to reintroduce complexity when they have they have the desire or bandwidth for it.
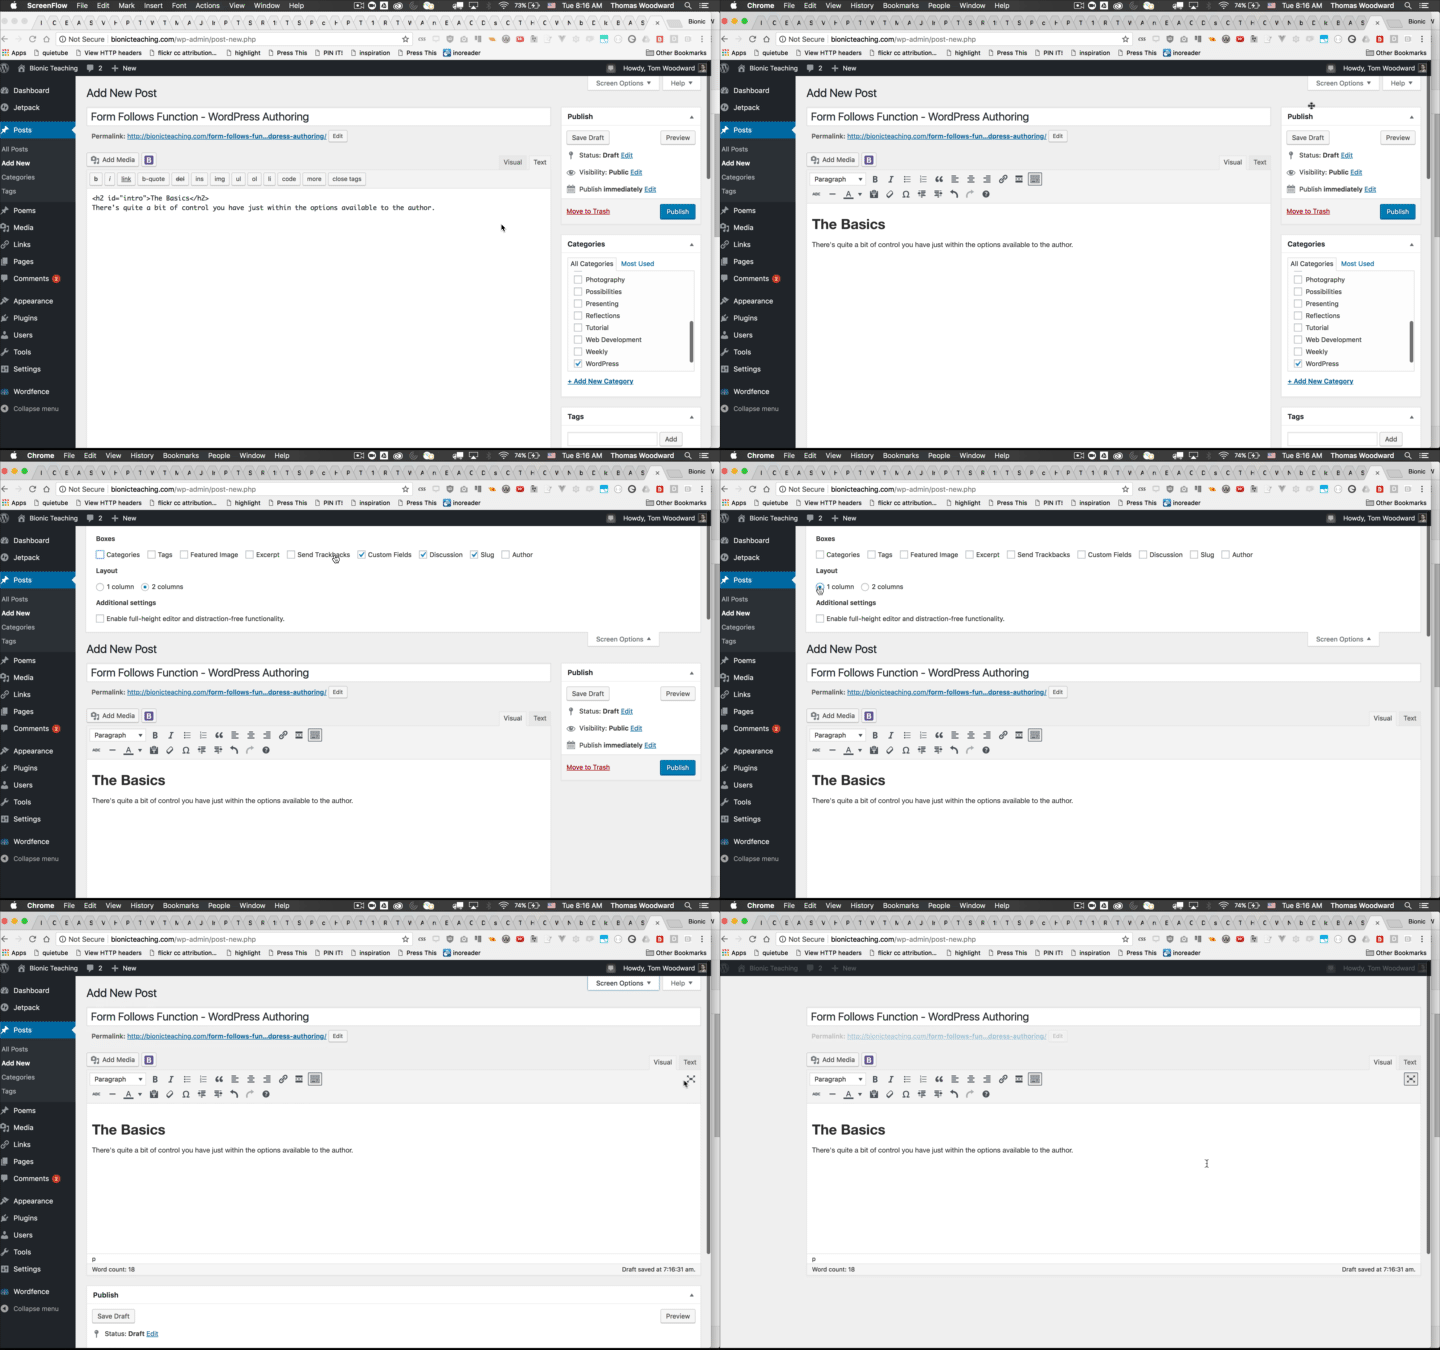
You can see the progression in the gif below from my typical view where I have most things turned on to the simplest view where everything is shut off, the Visual Editor is activated, and things are set to one column and full screen. It’s a pretty dramatic difference.

It’s also worth noting that the Screen Options are dependent on the page you’re on. For instance, these are the screen options for Appearance>Menu. You may note that CSS Classes is one of the options. It’s very handy for assigning your own classes to menu items but it’s not a place many people would think to look and it’s not necessarily a thing people would think to look for . . . that’s the battle. How do you show people all the cool/useful things your software can do without overwhelming them?1


Press This
The poor neglected “Press This” bookmarklet has long lived under the Tools sidebar element. It provides a stripped down authoring experience with the additional ability to easily grab information from whatever site you happen to be visiting. Sadly, it is no longer in core and requires this plugin but it remains awesome and very useful. Usually getting the bookmarklet added is the hardest part of the process and from there people have no problems. It’s also provides another path to minimalist authoring with a bit of work.
Simplicity By Plugin
There are also ways to make a number of these choices the default and/or to further restrict other interface elements. You can make WordPress very, very simple.
It requires a bit more effort than walking people through which boxes they might want to check/uncheck but it might be the right choice for your particular scenario. These examples will either involve plugins that you find2 or plugins that you write. I’ve done a few variations and have some examples that might be useful if you’re comfortable with some basic PHP. You can associate these choices with particular user roles (contributor, author, something custom) or even with specific accounts depending on your needs.
Change the Default Screen Options
You can also change what metaboxes are visible. You’ll use the hidden_meta_boxes hook to do it. You should be able to use default_hidden_meta_boxes hook and leave them as options to be changed by the user but I was having no luck and ran out of patience. The naming convention of the metaboxes is close enough to make you think you’ll know what to call them but it’s really a trick to build your confidence. I listed just about all of them below. Many of them end in div except for the ones that don’t.
One option for a scenario like this would be to release elements based on the number of posts someone has made. You could set it to hide the categories box until the author has made at least 10 posts etc. etc.
add_filter( 'hidden_meta_boxes', 'minimize_default_hidden_meta_boxes', 10, 2 );

function minimize_default_hidden_meta_boxes( $hidden, $screen ) {
	//you get the names of these elements from the id in the sidebar
			$hide_these = array(
			'trackbacksdiv', //trackbacks
			'postexcerpt', //post excerpt
			'postcustom', //custom fields
			'slugdiv', //slug
			'authordiv', //author
			'commentstatusdiv', //discussion aka comments
			'tagsdiv-post_tag', //tags
			'categorydiv', //categories
			'formatdiv', //format
			'postimagediv', //featured image
			);
	  		return array_merge( $hidden, $hide_these );
}
Skip the Dashboard
Many people have no use for the dashboard and they just want to get to writing a post. This would skip you right past the dashboard and right into the post editor.
//redirects from dashboard to posts and removes the dashboard menu item
function remove_the_dashboard () {
if (current_user_can('level_10')) {
    return;//if your an admin do what you like
    } else {
    global $menu, $submenu, $user_ID;
    $the_user = new WP_User($user_ID);
    reset($menu); $page = key($menu);
    while ((__('Dashboard') != $menu[$page][0]) && next($menu))
    $page = key($menu);
    if (__('Dashboard') == $menu[$page][0]) unset($menu[$page]);
    reset($menu); $page = key($menu);
    while (!$the_user->has_cap($menu[$page][1]) && next($menu))
    $page = key($menu);
    if (preg_match('#wp-admin/?(index.php)?$#',$_SERVER['REQUEST_URI']) && ('index.php' != $menu[$page][2]))
    wp_redirect(get_option('siteurl') . '/wp-admin/edit.php');}
}
add_action('admin_menu', 'remove_the_dashboard');
If you want to look at further ways to strip down WordPress’ backend experience, here’s a more involved post that covers more options.
Authoring Patterns Outside Vanilla WP
The examples above are about tweaking a fairly traditional authoring experience in WordPress. You go to the backend, you need an account, you use the normal paths . . . This section will focus more on alternate paths to creating content in WordPress. These paths will tend to require additional plugins but we’ll progress from easier examples to more technically complex examples.
Structured Authoring
It’s often very handy to provide a lot of structure for content that you want written in a particular way. It can guide thinking while also creating content that has more consistency. You can make sure that content comes in a particular way and that all the needed pieces end up being there.
WordPress doesn’t really provide for this kind of guidance natively. That’s where forms can be very useful.3 Any plugin that offers form-to-post options will work for this, my experience has been with Gravity Forms so that’s what I’ll use for these examples. We’re just going to touch on the possibilities here as Gravity Forms has hooks, filters, etc. that enable you to do much more than I’ll cover but I have to draw some line somewhere or I’ll never finish this post.
The Form to Post Merge
So we’ll start with a basic example of a form that builds the body of the post out of multiple form fields. We’ll also do a bit of HTML wrapping to make it a bit more polished on the display side of things. It may be helpful to think of it as a structured mail merge process for creating posts.
This is a nonsense example but it points out a couple of key functional elements. Feel free to submit stuff.You can see the video on making it as well if you’re interested. If you want to see actual examples, you can look at the following form/site examples. They are live/real so it’d be better if you didn’t submit things. If that makes you nervous in terms of using these types of submissions, you can set posts to go to draft rather than going live immediately.
- Bio Document Submissions
- Gestalt Theory Captures
- Text Sets for Education
- ALT Lab Examples and the form
Better Data Through Custom Fields
I learned the hard way that I almost always wanted to be able to sort or search based on any information that was entered via a checkbox, dropdown, or other pre-populated choice element. With Gravity Forms you have both categories and tags as options but you can’t repeat them. For instance in some scenarios we might have 20 categories but we’d like to have students think about them through two different questions. We can’t just repeat that category form field and select different categories for each field. The path I usually take to get around that is to use checkboxes or other restricted elements but build them as custom fields. Those custom field entries can then be used to show/hide the data on the front end. It’s the same work to create them so I almost always do that just in case. My normal pattern is to then use FacetWP to build little mini-interfaces for that data. You can see a pretty decent example of that type of interface where we built a submission/archive of World Studies syllabi.

Custom Composition
There are so many options when it comes to building ways for people to write using WordPress. Moving outside Gravity Forms, we have a whole different world of possibilities. You can involve whatever data you want, mix with other APIs, be front-end or back-end. They can be created with themes or as stand alone plugins. Here are a few examples we’ve made recently that might pry a bit at the edges of expectations.
A fully custom theme that uses Leaflet and the browser API to add points to a map. Students are using it to annotate the city of Richmond.
Here we have Advanced Custom Fields merged with a custom theme to build histology slide annotations. Two faculty members have entered over 4,000 main slides and I don’t know how many annotations.
Here we use WordPress posts in particular categories as a way to create content for TimelineJS. This is done with a standalone plugin.
An example of WordPress interacting with the APIs of other WordPress installations and PhantomJS to create snapshots of sites and build little communities. The author only has to enter the URL to the target site (which could be easily done via a form).

The Future
The future of WordPress and guiding authoring will be shaped by Gutenberg. It will result in some pretty significant changes in how people write in WordPress, how much flexibility they’ll have to create content, and how developers create themes and plugins. It opens up a world of new options but it’s going to take some time for me to really start to consider when it makes sense to make this jump. It’s beyond the scope of this post to go too deep into things but you should check out Jeff’s post if you’re on the technical side of things.
1 You can’t. All you can do is try.
2 If you don’t code or don’t have the time/desire, then I’d suggest checking out Adminimize. It’ll get you most of the way there.
3 While you can also create some pretty specific structures for writing using ACF or building custom post types with various meta boxes, that’s often more work and has a higher technical requirement.

One thought on “Form Follows Function – WordPress Authoring”
Comments are closed.