
We have an awesome general education course starting this semester called Cultural Passport (aka RVArts). The goal is to get students involved with the community’s cultural events – participating, promoting, reviewing them. The web side of this ends up being pretty interesting. See their video below for more details on the course.
When we started this conversation last year, I thought I was going to go the Gravity Form submission route1 and use a js library to make it possible to add the events to various calendars.
Like most projects, particulars shifted and we started changing things pretty radically right before winter break. We ended up shooting for full WordPress editor access for students to create events and the desire to write three different types of responses (interviews, reviews, and features) that would be associated with a specific event. Also, like most projects, this was all a bit beyond what I’d ever done before.
I started off thinking I’d create a custom post type for events. I was trying to make up my mind between using Advanced Custom Fields and CMB to help do that when I realized I hadn’t really thought about repeat events. The complexities involved there really made me rethink my decision to do this from scratch.
After that I started trying various plugins and eventually decided that Events Calendar Pro would let me deal with repeating events with the most flexibility. Their free version (The Events Calendar) is high quality too but lacks the repeated events capability and it’d be much harder to add some custom meta elements.
The desire on the front page was to show all the events occurring that day and the upcoming events for the week further down on the page. That meant two query loops, the first finding today’s date and finding anything that started on that day and the second finding anything that occurred in the next seven days.
After a bit of filling things with fake data, we found that repeated events had a tendency to take things over (a 30 day run of a museum exhibit for instance). There were a few ways to deal with this. You can filter out all events created using the repeat event creation option. That had the potential to get us in trouble with shorter run events of just a few days. We opted to create an additional category (long term) and use that when we wanted to opt the event out of the main display loops. That also gave us the benefit of additional flexibility down the road because we can remove that category from individual events (like the last few days) rather than say all 30 days of the event.
The loop below uses the tribe_get_events function. The whole front page setup can be seen here. That pattern let me set the other two loops.
<?php
//what is today
$now = date("Y-m-d");
//get the right events
$proj_events = tribe_get_events( array(
		'start_date'     => date( 'Y-m-d' . 'T00:00:01'),
		'end_date'       => date( 'Y-m-d' . 'T23:59:59'),
		'eventDisplay'   => 'custom',
		'posts_per_page' => -1,  //get all of them
		'tax_query'=> array(
                array(
                    'taxonomy' => 'tribe_events_cat',
                    'field' => 'slug',
                    'terms' => 'long-term',  //don't get the ones in the long term category
                    'operator' => 'NOT IN',
                )
            )
	), true );
	?>
I opted to use the _tk WordPress starter theme. It’s based on Bootstrap. I tried a few other starter themes for other formats but I still don’t quite have the right workflow for some of the SASS stuff down and I was struggling with enough new things at that moment.
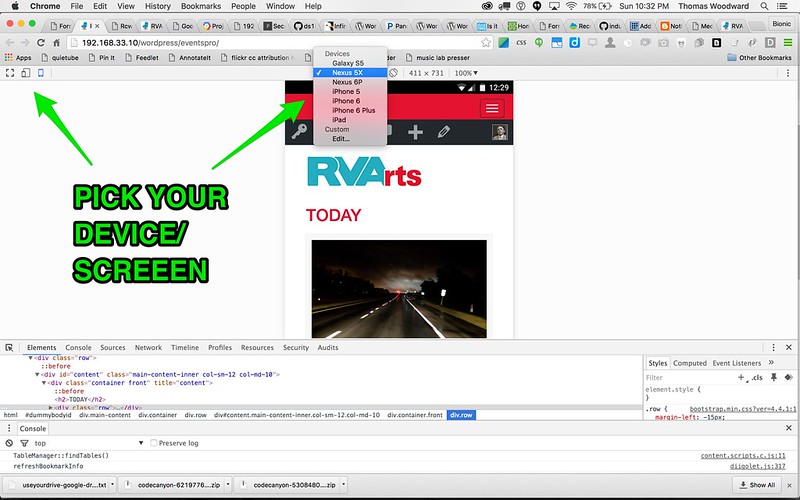
I did find a decent little CSS trick to help you see how the Bootstrap grid is playing out in real life. You can see it in pink in the image below.
[class^="col"] {
    background-color: rgba(255, 0, 0, 0.3);
}
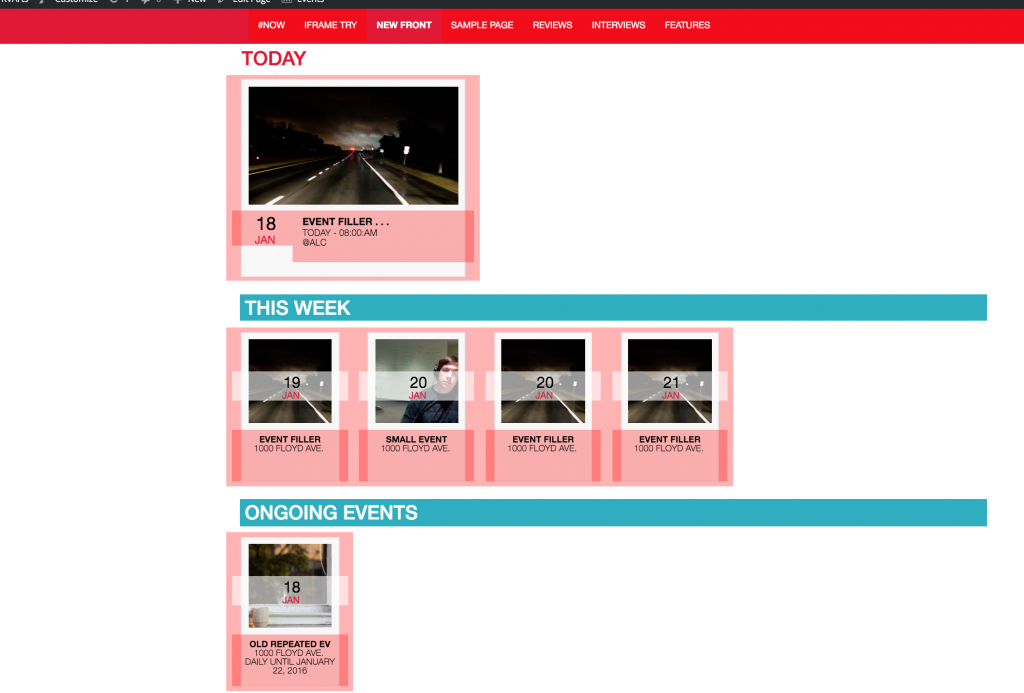
You can see today’s events being put in .col-md-4 (1/3 of the available space at medium resolutions and higher) and the events for the upcoming week being put in .col-md-2 (1/6 of the available space at medium resolutions and higher).
I’m sure I’m butchering a few things with the CSS and I continue to work on it but it’s decent at a variety of screen sizes. I need to work on a better pattern of naming and start at the mobile size first next time around. I do love that Google Canary lets you preview the site in all sorts of screen/device setups.
The next piece was to look at the individual events and tie in a few things.
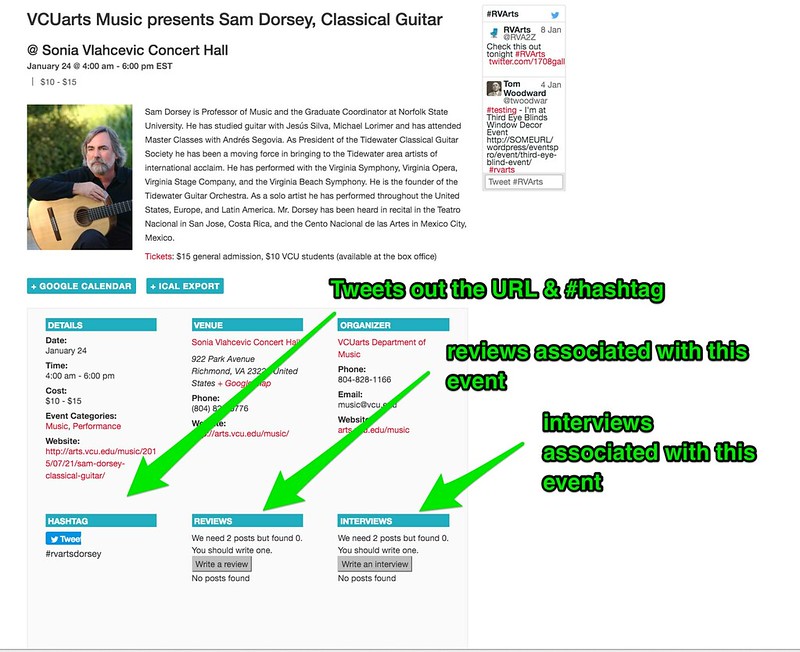
This isn’t the best view as I just zoomed out until you could see most things. The semi-interesting part is taking the hashtag assigned as an additional field option for each event and using that in the Twitter button and in associating the review/interview/featured posts with this particular post.
The hashtag field comes in as $value through the and is used in this section twice. Once, in the Twitter code and once to display the code in the view in case we wanted to use it in some way. This was done by altering the additional-fields.php file that comes with the Events Calendar Pro plugin. You can override these plugin options kind of like making a child theme- you make a (roughly) parallel folder structure in your theme and copy the file over from the plugin and make your changes there. Events Calendar Pro does help you out by telling you were to put the override file at the top of their plugin files. In this case I’m adding it at tribe-events>pro>modules>meta>additional-fields.php.
			<!-- Twitter button -->
			 <a href="https://twitter.com/share" class="twitter-share-button"{count} data-url="<?php tribe_get_events_link() ?>" data-text="I'm at <?php the_title();?>" data-via="RVA2Z" data-size="large" data-hashtags="rvarts, <?php echo $value;?> ">Tweet</a>
<script>!function(d,s,id){var js,fjs=d.getElementsByTagName(s)[0],p=/^http:/.test(d.location)?'http':'https';if(!d.getElementById(id)){js=d.createElement(s);js.id=id;js.src=p+'://platform.twitter.com/widgets.js';fjs.parentNode.insertBefore(js,fjs);}}(document, 'script', 'twitter-wjs');</script>
				<div class="tweet-term">
				<?php
				// This can hold HTML. The values are cleansed upstream
				echo "#".$value;
				?>
The next step was to figure out a decent way for students to associate their reviews/interviews/features with this particular event. Ordinarily, I’d do this through a Gravity Form as it solves the issues around putting in the right categories/tags but it doesn’t give students the full options they’d have inside WordPress (uploading multiple images for instance). I opted to do something in the middle this time and created a button that only shows up for logged in users. It puts their post in the appropriate category (reviews/interviews/features), adds the assigned hashtag to associate it with the particular event and then moves them into the editor window to write the post with that content pre-populated.
The chunk below pulls content from two categories (reviews and gold). Gold is the category that the instructors are using to approve the content. The use of the Gold category is restricted to admins by the Restrict Categories plugin.
The loop only shows the first two posts and doesn’t show the button if two posts have been approved. That’s done to encourage people to cover lots of different events.
<?php

					// The Reviews Query + the hashtag - shows only the first two submitted
					$args = array(
						'category_name' => 'reviews+gold',
						'tag' => $value,
						'posts_per_page' => 2,
						'order' => 'ASC',
						);


					$the_query = new WP_Query( $args );
					//only display option to write a post if user is logged in
					if ( is_user_logged_in() ) {

						$found_posts = $the_query->found_posts;
						$writesomething = 'We need 2 posts but found ' . $found_posts . '. You should write one.';

							if ($found_posts < 2) {
								$formurl = site_url('/wp-content/themes/rvarts/create_post.php');
								echo $writesomething;
								echo '<br/>
								<form action="'.htmlspecialchars( $formurl ).'" method="post">
								<input type="hidden" name="postcategory" value="reviews">
								<input type="hidden" name="posttag" value="'. $value .'">
								<input type="submit" class="button" name="submit" value="Write a review" />
								</form>
								';

							}
							else{
								//just roll on
							}
					}
					// The Loop
					if ( $the_query->have_posts() ) {
						while ( $the_query->have_posts() ) {
							$the_query->the_post();
							echo '<a href="' . get_the_permalink() . '"><div class="review">';
							echo  the_post_thumbnail('thumbnail' , array( 'class' => 'alignleft' )) . '<br/><h3>' . get_the_title() . '</h3><div class="review_excerpt">' . get_the_excerpt() . " . . . <br/> (click for more)";
							echo '</div></div></a>';
						}
					} else {
						// no posts found
						echo 'No posts found';
					}
					/* Restore original Post Data */
					wp_reset_postdata();

					?>
			</dd>
		</dl>
</div>
1 I thought I wrote a full tutorial on this but can’t find it. I often have unrealized good intentions though . . .