I’m not a programmer. If you’re a programmer, you don’t need me. This tutorial is written for people who are equally clueless. Notice, I am clueless. This is cobbled together from a series of different tutorials, libraries etc. I may very well have done some stuff wrong but it works.
So with that warning out of the way, why might you want to do this? Speed with large(r) amounts of data.
I needed a page that loaded a fairly large amount of information (~1700 rows) and then let people sort through the data quickly. It is a lot like what you can do with Exhibit but I built one version with a Google Spreadsheet backend but it was too slow. I tried pulling all that data into straight JSON and it did make it faster . . . but still too slow.
So there went my tried and true methods. I considered pulling the data into WordPress which is the other way I normally cheat my way out of programming1 but given the information was going to change, it was likely to be more of a pain than it was worth. For the record, there are CSV to post plugins for WP that work decently.
CSV to MySQL
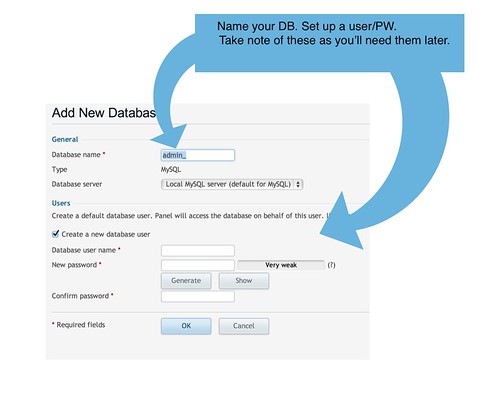
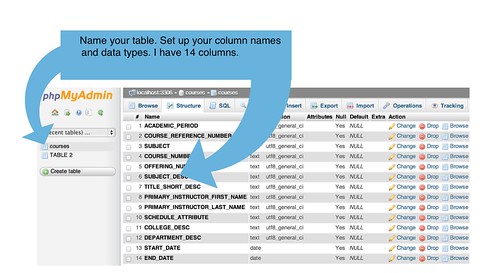
To start I had a CSV file of courses, step one was to get those data in a database. This is pretty easy with phpMyAdmin. I had to make a database, make a user/pw combo, and then make a table with the right number of columns. Those columns needed names and data types.
There are lots of tutorials that go into the details of creating a database and table using phpMyAdmin. There are even conversations about naming conventions in mysql databases. I should have read this last one, but I just used the names already created in the CSV export which came from a SQL database and figured it’d be ok. Then there’s a handy import CSV option in phpMyAdmin. Do that. You can also replace all the data each time if you screw up.
A couple of things tripped me up initially. First, I didn’t check the box to allow “NULL” entries. I needed to do that. If you don’t do that whenever data are missing, the import dies. Secondly, I left in on the default data type instead of changing almost all of my fields to “TEXT”. There are lots of fairly detailed conversations around this but I think for most people who’d get this far, you’ll be using text or will be fairly unconcern with the nuances of difference that matter quite a bit when you’re building for huge scale.

cc licensed ( BY SA ) flickr photo shared by Tom Woodward

cc licensed ( BY SA ) flickr photo shared by Tom Woodward
PHP to MySQL
Now that your information is in its nice database house, we’ll need to prove we are not a stranger and have the keys to the house. PHP is going to be the way we do that.
W3Schools is where I started with how to do that.
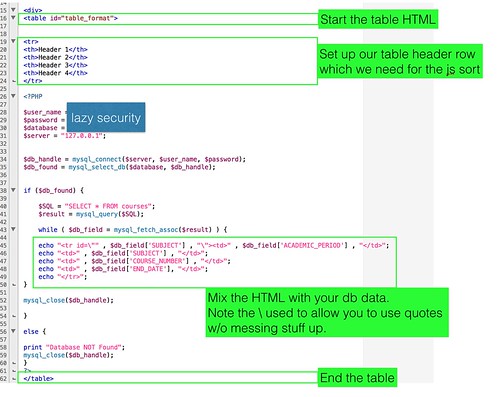
I went with this version, which is more bulkier but felt clearer to me.
$user_name = "THIS IS YOUR USER NAME FOR THE DB";
$password = "THIS IS YOUR PASSWORD FOR THAT USER";
$database = "THIS IS THE NAME OF YOUR DB";
$server = "127.0.0.1";

cc licensed ( BY SA ) flickr photo shared by Tom Woodward

cc licensed ( BY SA ) flickr photo shared by Tom Woodward
I picked up a rough idea of what to do to build the HTML table over here.
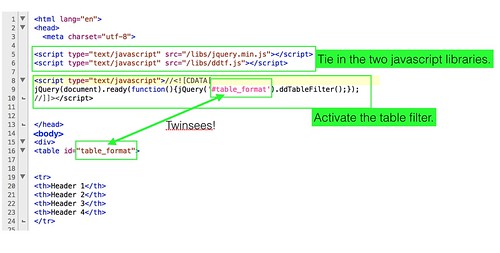
JQuery and Drop Down Table Filter work together to give me the on the fly filtering without having to do all the work. To make it work I need a table header row.

cc licensed ( BY SA ) flickr photo shared by Tom Woodward
Here’s how the whole thing comes together below. It works.
| Header 1 | Header 2 | Header 3 | Header 4 | " , $db_field['ACADEMIC_PERIOD'] , " | " , $db_field['SUBJECT'] , " | " , $db_field['COURSE_NUMBER'] , " | " , $db_field['END_DATE'], " |
|---|
