I admit to struggling mightily with my patience using Power Automate. I can do all of the things I’m attempting in Google Script or with Gravity Forms in WordPress . . . and yet.
Some of it is certainly me. Some of it, I would swear, is Power Automate/Microsoft.
Anyway, the goal here is to let students submit some information via a form so they can be matched up with an alumni to go over portfolios, code interviews, stuff like that.
The form part is easy. We can hide show additional fields depending on the needs of the match up. That all goes to a central Excel spreadsheet in a MS Teams groups/SharePoint/Office 365/MS Namey Name. That Excel sheet has another page with alumni info.
The program manager goes into the form submissions page and selects an alumni from a drop down to pair with the student. Then they confirm via another drop down (maybe overkill) That will trigger an intro email that attaches a file or two and connects student and alum.
Most of this is pretty straight forward.
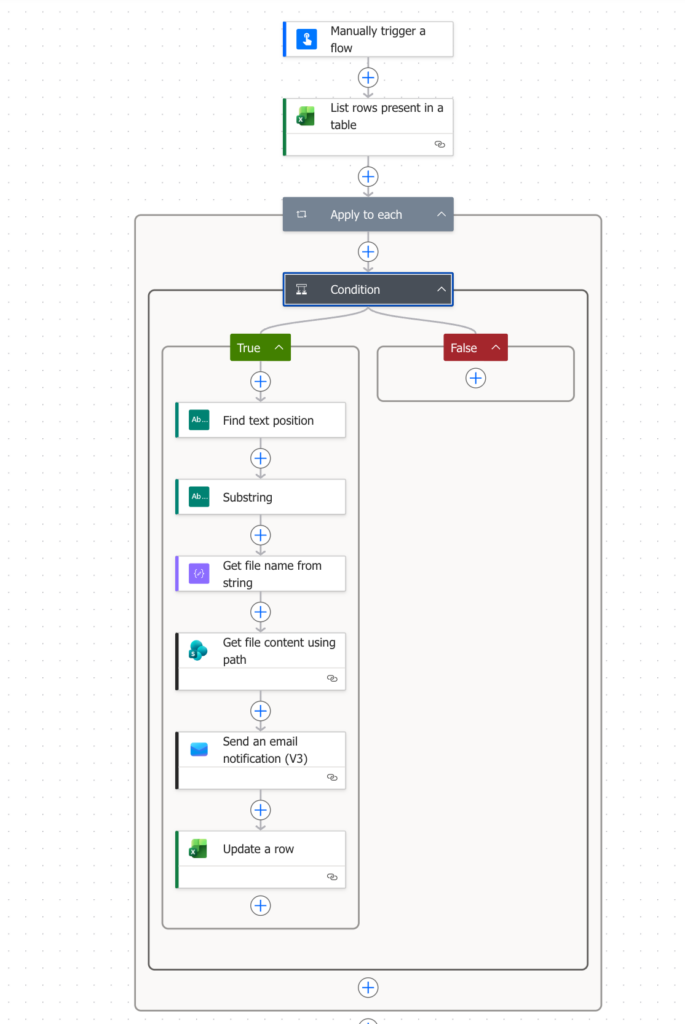
We can get the spreadsheet using the “List rows present in a table” component. That’s all drop downs to pick the file where it lives. The requirement for the data to be a table seems odd to me, but I’m a simple man.
Now we have all the data. We need to loop through the rows with the the “apply to each” component that gets the data from the “List rows present in a table” component. Hit the lightning bolt in the editor and you can pick it.
Since we don’t want to send emails to everyone always, we need to add a “condition” component. Here I can use lightning bolt again, look for me “list rows present in a table” and click “see more” to view all the columns. Here I set confirmed to = yes and the email sent column does not contain sent using the AND operator. So both things need to be true for the email workflow to happen. If they aren’t, it just skips it.
I’m going to describe the stupid way I did this part to show three things: one- you can do things if you’re stubborn, two- I should read the manual with more patience, three- I don’t know how to punctuate a list like this.
The hassle here is with attaching the file to the email. We get the full URL path in the spreadsheet from the form. Power Automate wants that in two pieces. There’s a core Site Address and then a File Path. Below is an example URL with a few names changed to protect things that no one cares about.
https://FAKENAME.sharepoint.com/sites/FAKETHING/Shared%20Documents/Apps/Microsoft%20Forms/FAKE%20form/Question/Director%20of%20Learning%20Spaces%20and%20Technologies_Tom%20Woodward.pdf
If memory serves, I need https://FAKENAME.sharepoint.com/sites/FAKETHING/ and /Shared%20Documents/Apps/Microsoft%20Forms/FAKE%20form/Question/Director%20of%20Learning%20Spaces%20and%20Technologies_Tom%20Woodward.pdf
So the awkward solution is to use the “Find Text Position” component with the Your-Resume-column data and look for Shared%20Documents in the string. Then use the “Substring” component to get the text string starting at the number returned by that component. I really hated this. I just wanted to use regex or javascript.
Turns out I can do it in a better way and I can do it in lots (maybe all?) of these components. I just had never hit the “insert expression” button. I guess these are written in Workflow Definition Language (WDL). You can see more about how that all works here. Seems crazy not to just use a normal language of some kind, but MS is going to MS.
So I can add a data operation component and put in an expression like last(split(items(‘Apply_to_each’)?[‘Your resume’], ‘/’)) which enables me to get the name of the file from the full URL path. I need that because when you attach it to the email, if you don’t name it and have an extension it attaches as a .txt file. I could now go back and revise things, to remove a component or two.
So now we have most of the hassle out of the way. There is a Send an email notification component where these pieces can be plugged in. It’s a lot like mail merge. The advanced parameters section is where you need to add the attachment file and file name.
The final step is to update the Excel sheet using the Update a row component. The only tricky part here is you have to have a unique ID for the key value. I don’t know why given it’s in a loop with a single row of data, but it is what it is. Advanced parameters is where you select the column to update.
So functional at the base level.
I learned I can rename the components once I add them to make it easier to understand what is what. The icon remains associated with the component type and when I forget what the icon means, I can click on the about tab to see the component type. A smart naming structure might help avoid that.
I did have some issues with how errors are displayed when you test the flow. Beware that errors down in the loop will show up as errors much higher in the flow than I would expect. I ended up trying to troubleshoot issues there when the problem was with a sub-component. Live and learn. Then forget and re-learn it after you forgot from a few hours ago. Then get mad.