I’ve been fairly obsessed with animated gifs lately. My apologies. It was really If We Don’t, Remember Me that had me stuck in this loop. This person churns out such really interesting visuals, I couldn’t rest until I got something fairly close. I feel like the image above, while not perfect, is close enough to let things rest for a while1.
Initially, I just thought IWDRM was just a master of choosing just the right clip. Now, that part can’t be discounted but there’s a lot of other things that go on to improve the final product. While fairly simple, I’ll try to detail what I did and how I eventually learned to make it more economical time wise. I’m not a PS guy, so there may be even better ways. If you know them, let me know.
This is tilted towards CS4 but I imagine the concepts will make sense if you use other versions or other software.
- Clip your video down in Quicktime or something like that. You can edit in the PS import tool but it’s awkward.
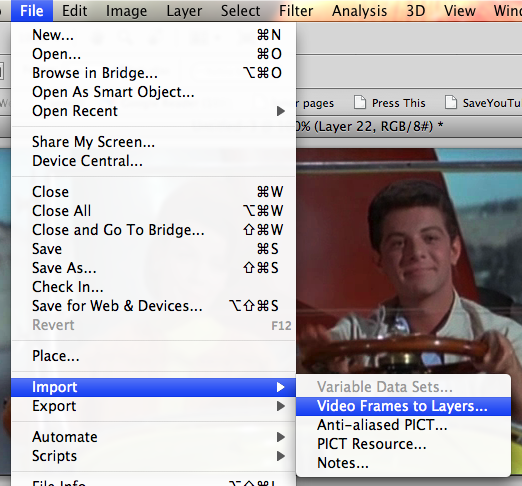
- Import the video files to layers.

- The animation window will be at the bottom. Edit it until you’ve got a decent cycle going. The first frame will be the still portion of the image so choose one that is clear. Keep in mind you can change the speed of the frames. Sometimes slowing it down helps.

- With the second frame selected in the animation window. You’ll see that there is the eye icon on the corresponding frame in the Layers menu. Click on the first layer in the place where they eye should be. You should now see two eyes, indicating both layers are active. It should look like the image below.
- Now on the second layer, erase everything you want to be motionless. You’re going to have to repeat the process above for every frame in the animation and every related layer so it pays to keep the numbers down. It’s also much easier to use the lasso tool and select the portions you’d like to erase. If you hit delete instead of cut or some other option, the selection stays and you can pretty rapidly go through the steps where you activate the “eye” on the layer and then just hit delete again.
You can see the start of that in the image below. I eventually selected everything except Ricky’s (?) head and his drumming arm.

- You can preview the animation by hitting the space bar at any time. This helps me immensely.
- Make sure when you go to delete, that you’ve selected the right layer in the layers panel or nothing will happen.
1 The gif is from some beach something something video. I was just randomly watching old movies on Netflix instant watch to make capture quality better and easier.


Masterful image, and thanks for the tutorial, I am gonna stay late at work (cause I ain’t got no PS on my computerz) and play with this tutorial for my Lebowski. I know I can make that the perfect animated GIF, the best ever produced. Period. End Paragraph. End the world.
And Tom, obsession makes the web a great place, don’t you change, baby!
This makes me want to track down a copy of PS. If nothing else, it gives me a clearer way of breaking down and understanding the better GIFs out there.
And man, I do envy how good you’ve gotten.
Incredible job and a great tutorial. Oh, and that’s Frankie, as in Avalon.
@Jimmy – Clearly, obsession is something I’ve never had to worry about having too little of. I am overly competitive even in animated gifs.
@Brian – Improvement came at a price. The Eastwood gif took 3 or 4 tries and about 4 hrs and I was still mad at the result. That led to the beach one. I think you could do almost everything I did in GIMP- or any graphics editor that allows for multiple layers – although it might take longer.
@Andy – Frankie, Bobby, Ricky, I knew it was something like that. I remembered her name was Annette Something or rather but it was late and I didn’t care enough to look it up.
Great tutorial. Thanks, Tom. — I’ve found that it cutting down on the number of frames helps to keep the size of the finished product down considerably. Movie clips typically have a 24fps and cutting it down to 12fps by deleting every other frame and then cutting the playback speed by half gives you a smaller file that doesn’t look significantly different from the original.
Mikhail – Agreed, in PS you can actually change frame rate when you do the initial import. That simplifies things a bit.
Thanks for this tutorial — I really wanted to figure out the best technique but was too lazy to actually think about it.
Oh, and that’s not JUST Frankie up there. That’s also THE Annette Funicello. You sexist white men.
Martha – I’d bet you’re focused on doing something else so I’ll discount the laziness comment. I focus on Frankie because he’s all grove. She’s all frozen window dressing.
OK – so I’m having a problem – when i erase the layer and then animate, the layer that is erased only shows that layer – it doesn’t combine with layer 1 (in other words, I shot a short movie of my son taking off his hat, image 1 is all there, image 2 or layer 2, is just the hat, everything else is erased – the image that I want frozen is not there). So, you have one solid image and the rest are not solid – they are blank in sections. What am I doing wrong? I’m using Photoshop Elements 8 and a mac, but I’m pretty sure the problem is with me – not the PS I’m using. Thanks a million – this has been driving me crazy and I was so excited to see your tutorial.
Megan – It sounds like you aren’t activating the base layer for each frame. You have to have the “eye” icon (see picture) active on the base layer for each animated frame. Am I making sense?
Thanks, I’ve been wanting to learn this for awhile. I had the same problem as Megan, until I figured out what I was doing wrong: not selecting each animation frame and THEN erasing the corresponding layer. Also, you have to keep turning the eye icon back on for the base layer each time. Here’s my first try, from “The Big Lebowski”:
http://28.media.tumblr.com/tumblr_ljfmgzdxrt1qzbjzmo1_400.gif
A much quicker way to delete the content you want to not move is to group the layers into a folder and apply a layer mask to the whole folder.
* For instance, in the image above, put layer 1 (also frame 1) at the bottom. It stays out of the folder.
* Create a new folder, drop everything else in that folder (all other layers/frames).
* Grab the lasso tool and highlight everything you want to delete (or keep, depending on how you look at it), choose the folder from the layers bar, and then click the “Add a Mask” tool (it’s in the bottom of the layers palette and looks like a square with a circle in it). This will automatically hide everything outside of your selection in all of the layers included in that folder. Much faster than going through one at a time.
You could do this multiple times too, if you want to have different bases that are on/off, grouping different layers and hiding different sections of the frame.
Hope this helps.
Jason- I’ll definitely give that a shot. It would make things amazingly faster. I only mess with PS occasionally so tips like that are very helpful.