I don’t know why these two things are connected in my head but they are.
So this is another one of those odd workflow posts. Here’s the scenario.
- I built a Slack App in their Bolt javascript SDK.
- That app has a command /courseupdate that triggers a modal with a selection and three text entry fields.
- Submission of that modal form creates a custom post type on a WordPress site.
- That custom post type is created with three ACF fields updated and a tag added so the update can be associated with a particular project.
You can see it in action in the video below. There’s also a custom WordPress theme involved but it doesn’t really matter for this conversation.
Various Resources
- The app runs on Heroku because that seemed the easiest route at the time to host the app.
- The Bolt framework to build the Slack portion runs in Node.
- The WP-API to connect the Slack actions to the WordPress site via the WordPress JSON API (also runs in Node).
- JSON formatter so I could more easily see what was going on with some of the JSON.
- There are a variety of tutorials that I used but none of them quite worked for me by themselves.
Building the Slack App
A Slack App is built in two pieces. There is the programming and then there is the management of the app and its permissions which is done on the Slack platform. I find the Slack platform side of things a bit awkward.
Slack Web Site Side of Things
You need to name your app and get the ID and keys. That’s covered well in the tutorials. You then need to give it access to all the capabilities it’ll need to interact with Slack and the users of Slack. This is a combination of permissions, events, and the callback URLs for your app.
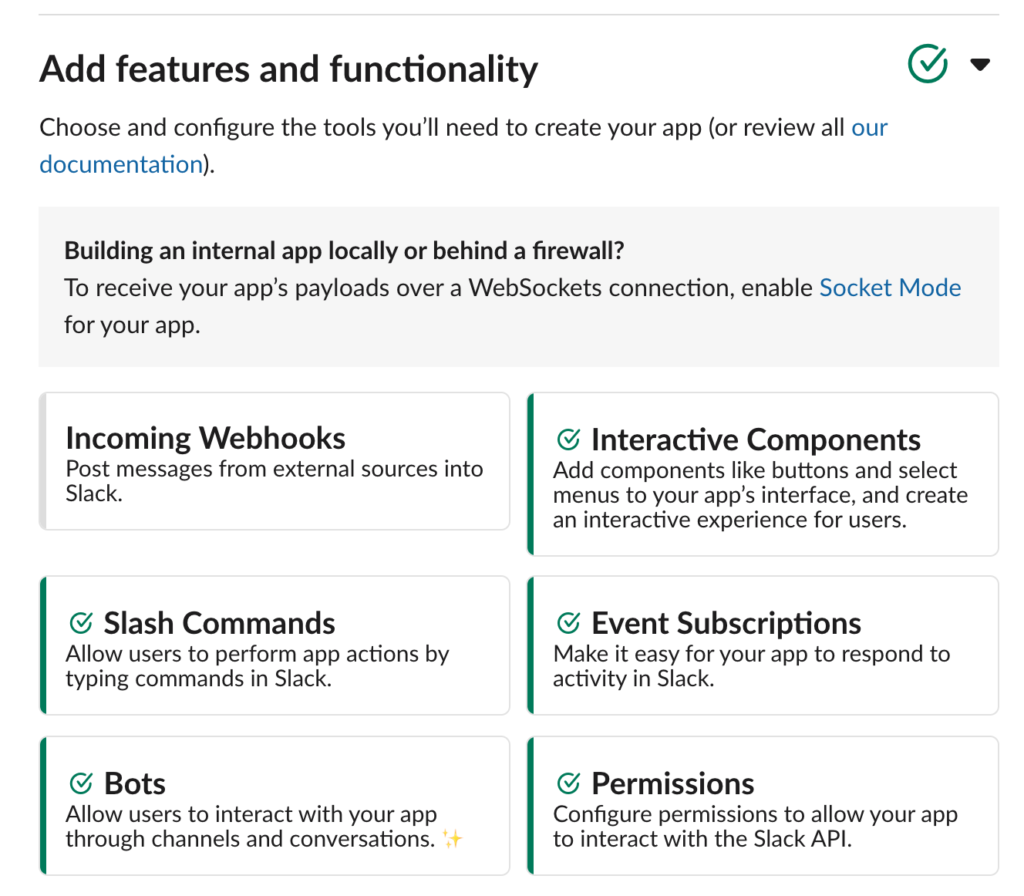
Permissions
These are the macro settings under Basic Information >> Add features and functionality. I ended up activating everything except incoming web hooks.
Then there are micro-permissions under Features >> OAuth & Permissions and the Bot Token Scopes. Again these depend on what you want the app to be able to do.
Events
In Event Subscriptions and Interactivity and Shortcuts, I need to put in a request URL. This worked for me with my Heroku app name being the first portion of the URL.
https://your-special-name.herokuapp.com/slack/events
Slash command
This is easy, just make a command and take note of it for use as a trigger for the app.
Javascript-land
Here’s the whole file but I’ll be breaking out pieces below.
Your friend will be the Heroku build logs. That’s where you can console.log things and see what’s going on. I used lots of console.log(JSON.stringify(whatever)) to see the JSON and then would often throw it in JSON Pretty Print to help me see the structure better.
I followed the initial steps from this tutorial to get Bolt and the Heroku stuff going.
Step one is to load bolt and wp-api. The second portion uses Heroku’s ability to store set config variables so that passwords and things like that don’t wander out into the public view.
const { App } = require('@slack/bolt');
const WPAPI = require( 'wpapi' );//add in http://wp-api.org/node-wpapi

// Initializes your app with your bot token and signing secret
const app = new App({
  token: process.env.SLACK_BOT_TOKEN,
  signingSecret: process.env.SLACK_SIGNING_SECRET
});
Now we’ll take a look at the main Slack App component for a modal.
The first line is looking for the /courseupdate command and then waits (await ack()) until it’s acknowledged. Then it builds the view using blocks. You can see them in the full source but the main thing I’d mention is that adding block_ids and action_ids to the elements will make parsing the JSON much easier. The final submission piece is required for modals that have input blocks and makes the submit button.
app.command('/courseupdate', async ({ command, ack, body, client }) => {
  await ack();  // Acknowledge the command request

  try {
    // Call views.open with the built-in client
    const result = await client.views.open({
      // Pass a valid trigger_id within 3 seconds of receiving it
      trigger_id: body.trigger_id,
      // View payload
      view: {
        type: 'modal',//what kind of thing is this
        // View identifier
        callback_id: 'course-submit',//keep track of the callback id
        title: {
          type: 'plain_text',
          text: 'Course Update'
        },
        blocks: [{
           //****all the formatting blocks go here but are removed for now for space
          }
        ],
        submit: {
          type: 'plain_text',//standard stuff and required for modals
          text: 'Submit',
        }
      }
    });
  }
  catch (error) {
    console.error(error);
  }
});
Now that we’ve built the modal and submitted it, we need something to receive the results. This one is pretty simple. It gets the data from the modal and then passes it to a function I wrote to create the blog post. If that function works it sends the user a direct message confirming the success.
app.view('course-submit', async ({ ack, body, view, client }) => {
  // Acknowledge the action
    await ack();
    console.log(JSON.stringify(body));//see the data getting passed
    let msg = '';

    const user = body['user']['id'];
    const name = body['user']['username'];
    const results = await createWpUpdate(name,body);//my wordpress creation function

    if (results){
      msg = 'Your update was successful.'
    } else {
      msg = 'I am a failure but I do not know why.'
    }

    //message the user
    try {
      await client.chat.postMessage({
        channel: user,
        text: msg
      });
    }
    catch (error){
      console.error(error);
    }

});
The WP-API side of things is not too bad. It took me a while to get the custom post and ACF fields straight but making regular WP posts is really straight forward.
I found something on setting up a namespace and route for a custom post type on this GitHub issue. Once that is straight, you can replace wp.post with wp.custom-post-name (in this case wp.update).1
The other piece that was a hassle was setting the Advanced Custom Fields. Turns out I needed to do two things. You’re updating the fields via meta: {field_name: value} on the javascript side but you also have to make sure you’ve declared them with register_meta on the PHP/Theme side of things. I think I set it for all posts rather than just the custom post type ‘update’ but I was ok with that.
function createWpUpdate(slackuser, body){
//get you Slack data from the JSON
    const values = body.view.state.values;
    let good = values.good_stuff.good_input.value;
    let flag = values.flag_stuff.flag_input.value;
    let other = values.other_stuff.other_input.value;
    let course = values.course_selection.course_input.selected_option.value;//easy to miss selected_option
    let courseId = courseTagToID(course);//transform slug to ID
    var wp = new WPAPI({
      endpoint: 'http://something.middcreate.net/slack/wp-json',//your WordPress URL
      // This assumes you are using basic auth, as described further below
      username: process.env.WP_USER,//set via Heroku ENV variables
      password: process.env.WP_PASS//set via Heroku ENV variables
  });
    var user = process.env.WP_USER;

  //establish route for custom post type update ***************** from https://github.com/WP-API/node-wpapi/issues/275
  const namespace = 'wp/v2';
  const updateRoute = '/update/';

  wp.update = wp.registerRoute(namespace, updateRoute);

//date
  const currentDate = new Date();
  const currentDayOfMonth = currentDate.getDate();
  const currentMonth = currentDate.getMonth(); // Be careful! January is 0, not 1
  const currentYear = currentDate.getFullYear();

  const dateString = currentDayOfMonth + "-" + (currentMonth + 1) + "-" + currentYear;

  wp.update().create({ //leave as post instead of update if just regular post
      // "title" and "content" are the only required properties
      title: slackuser + ' via slackbot on ' + dateString,
      content: 'nothing to see here',//I'm not using the content for anything
      post_type: 'update',
             //  },
      meta: {
        going_well: good,//tied to defining them on the WP side w register_meta
        flags: flag,
        else: other
      },
      tags: [ courseId ],//needs to be the ID for the tag
      // Post will be created as a draft by default if a specific "status"
      // is not specified
      status: 'publish'
  }).then(function( response ) {
      // "response" will hold all properties of your newly-created post,
      // including the unique `id` the post was assigned on creation
      //console.log( response.id );
  })
  return true;
}
In this case I’m also tagging the post based on the drop-down selection. I dealt with this in an ugly way. I can tie into the tags via WP-API and do this automatically but I was in a hurry and just did a manual function to tie the tag slug to the tag ID.
function courseTagToID(course){
  let courses = {
    'icc-global-leadership': 9,
    'japanese-ethnography-as-a-window-to-japanese-language-and-society': 10,
    'japanese-introduction-to-japanese-pedagogy': 11,
    'program-management': 12,
    'software-internationalization-and-localization': 13,
  };
  if (courses[course]){
      return courses[course];//remember the issue with hyphens in json
  } else {
    return 1;
  }

}
Lessons Learned
I’d never used Heroku, the Bolt SDK, or WP-API so there were lots of new things in this project for me. Not that it matters much but my only other experience with Node has been the build process for the Understrap theme so this was an expansion of knowledge.
I liked Heroku. My free version will shut down if left inactive for too long but re-triggering the command gets things started again. Pushing the changes with git and having the app rebuild each time is just slow enough for me to want to get distracted.
Logging is key. Always log things. Log them and look at them. Chant this as you go to sleep.
When you think you’re crazy and stupid, you probably just missed a JSON bracket.
Flotsam, maybe Jetsam
I named the app Tomte after the helpful Swedish house elves. I initially named it Friendly and then after failing to do some things for a while changed its name to Unfriendly.
1 This was a poor choice of names as update is likely to confuse people.