Time Lapse Trip from Richmond VA to Tampa FL from Tom Woodward on Vimeo.
This is my first attempt with the GoPro. I think it’s set to one shot every 30 seconds. You can see me fiddling with the settings a few different times if you’re masochistic enough to watch it through. The battery ran out early in the trip and resulted in me using it without the stand. That helps explain the repeated drifting as the USB cord1 pulls it slowly towards the driver’s side. It is interesting to see a 12.5 hr trip condensed down to 4 minutes or so. I may do it on the way back but pointed mostly towards the sky or maybe at the kids.
Knowing where the stops were makes me wonder if something similar would make for a interesting take on Dan Meyer’s original graphing stories.
On the other end of the time lapse spectrum is this attempt to condense one my attempts to fix a photo from the reddit pic request group. This one is kind of amusing to me in that you can see me googling some stuff for a sick child in the middle and finishing up with some posts to reddit and flickr. There is no sound but it’d be pretty easy to narrate if you wanted to make it more instructional.
The screenshots were generated based on this post. It is a copy/paste terminal command that will take a full desktop screenshot every X seconds.
i=1;while [ 1 ];do screencapture -t jpg -x ~/Desktop/screencapture/$i.jpg; let i++;sleep 4; done
Semi Tutorial
In either of the cases above you end up with a fist full of images. It used to be that you could set default input length for still images in FinalCut. I can’t figure out how to do that in FCP X. There are lots of people claiming (and even showing) other ways to bulk change the length of static images once they are in FCP. Several ways didn’t work for me. What did work is …. drag/drop the images into the timeline then . . .

cc licensed ( BY SA ) flickr photo shared by Tom Woodward
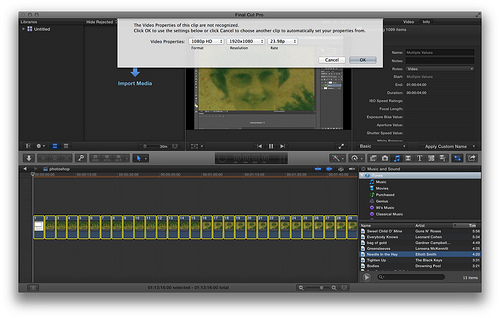
Just click yes or change the settings to your preferred set up.

cc licensed ( BY SA ) flickr photo shared by Tom Woodward
Once things have calmed down a bit, select all the images then ctrl click/right click. You’ll select “Create a compound clip“.

cc licensed ( BY SA ) flickr photo shared by Tom Woodward
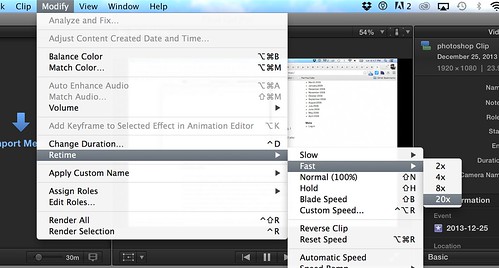
Then it’s Modify>Retime>Fast and your choice of speeds. You can also go back and enter a custom speed to get things to around the duration you want.
1 How strange to be able to easily charge USB devices in the car and even stranger to have the need to do so.

That’ about the only way to make I-95 exciting. I like the disk to dark transition and the drive through stops.
So is the Go-Pro mounted? I recall Grant Potter doing some long distance driving time lapses with iTimeLapse but forgot how he kept the iphone mounted.
There is an old school method — if the images are numerically named with the same base, in QuickTime PLayer 7, you can do “open Image Sequence”- select the first image in the sequence; it offers a range of frame rates from 60 frames per second to 10 seconds per frame
Happy vacation!
The Go-Pro was semi mounted originally. I used the case stand and just balanced it on top. It worked pretty well. Once it ran out of batteries I had to go no case and lost the mount. The majority is just the camera sitting on the dash, drifting around.
I appreciate the QT tip. I really just got mad I couldn’t do it the way I wanted in FCP. More stubbornness than anything else.
We are down in Tampa for the Iowa/LSU game. My father-in-law coaches for Iowa. Hope all is well is AZ.