
First, go try it out if you want. Submit something. It’ll help it make more sense.
I thought this would be a lot easier than I made it. I tried lots of paths and considered spending various amounts of money to make this easier. Please benefit (probably) from my wandering. I try to link in where I learned different things and, more importantly, I tried to emphasize vocabulary that might be useful to you.
My goal1 was to-
- have a Google2 Map interface that auto-located the device
- allow the user to drag the marker to adjust the location
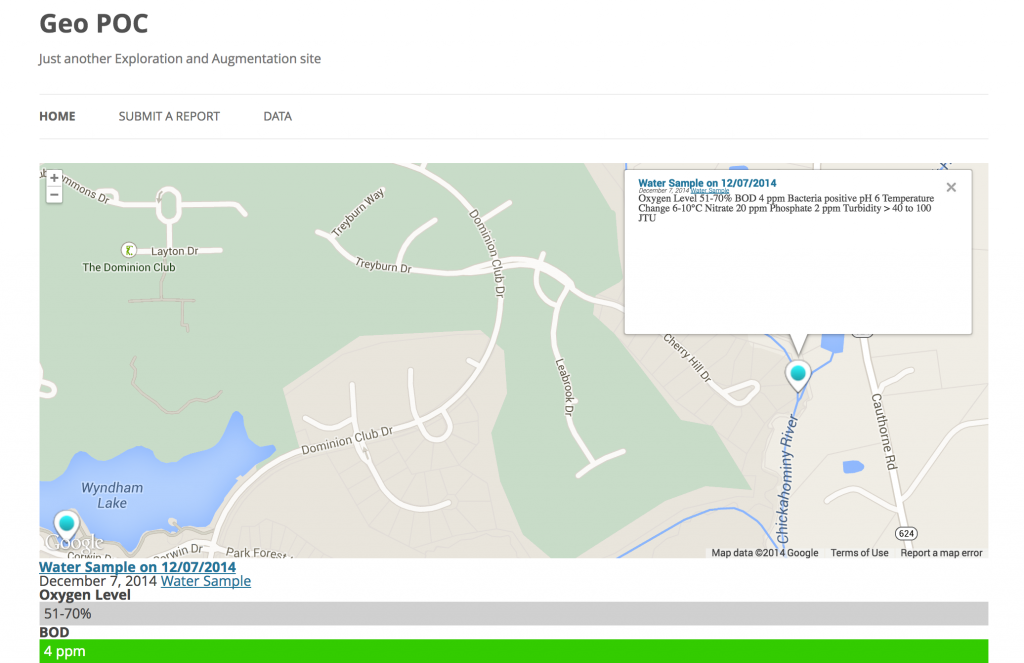
- plot the resulting WordPress posts on a map
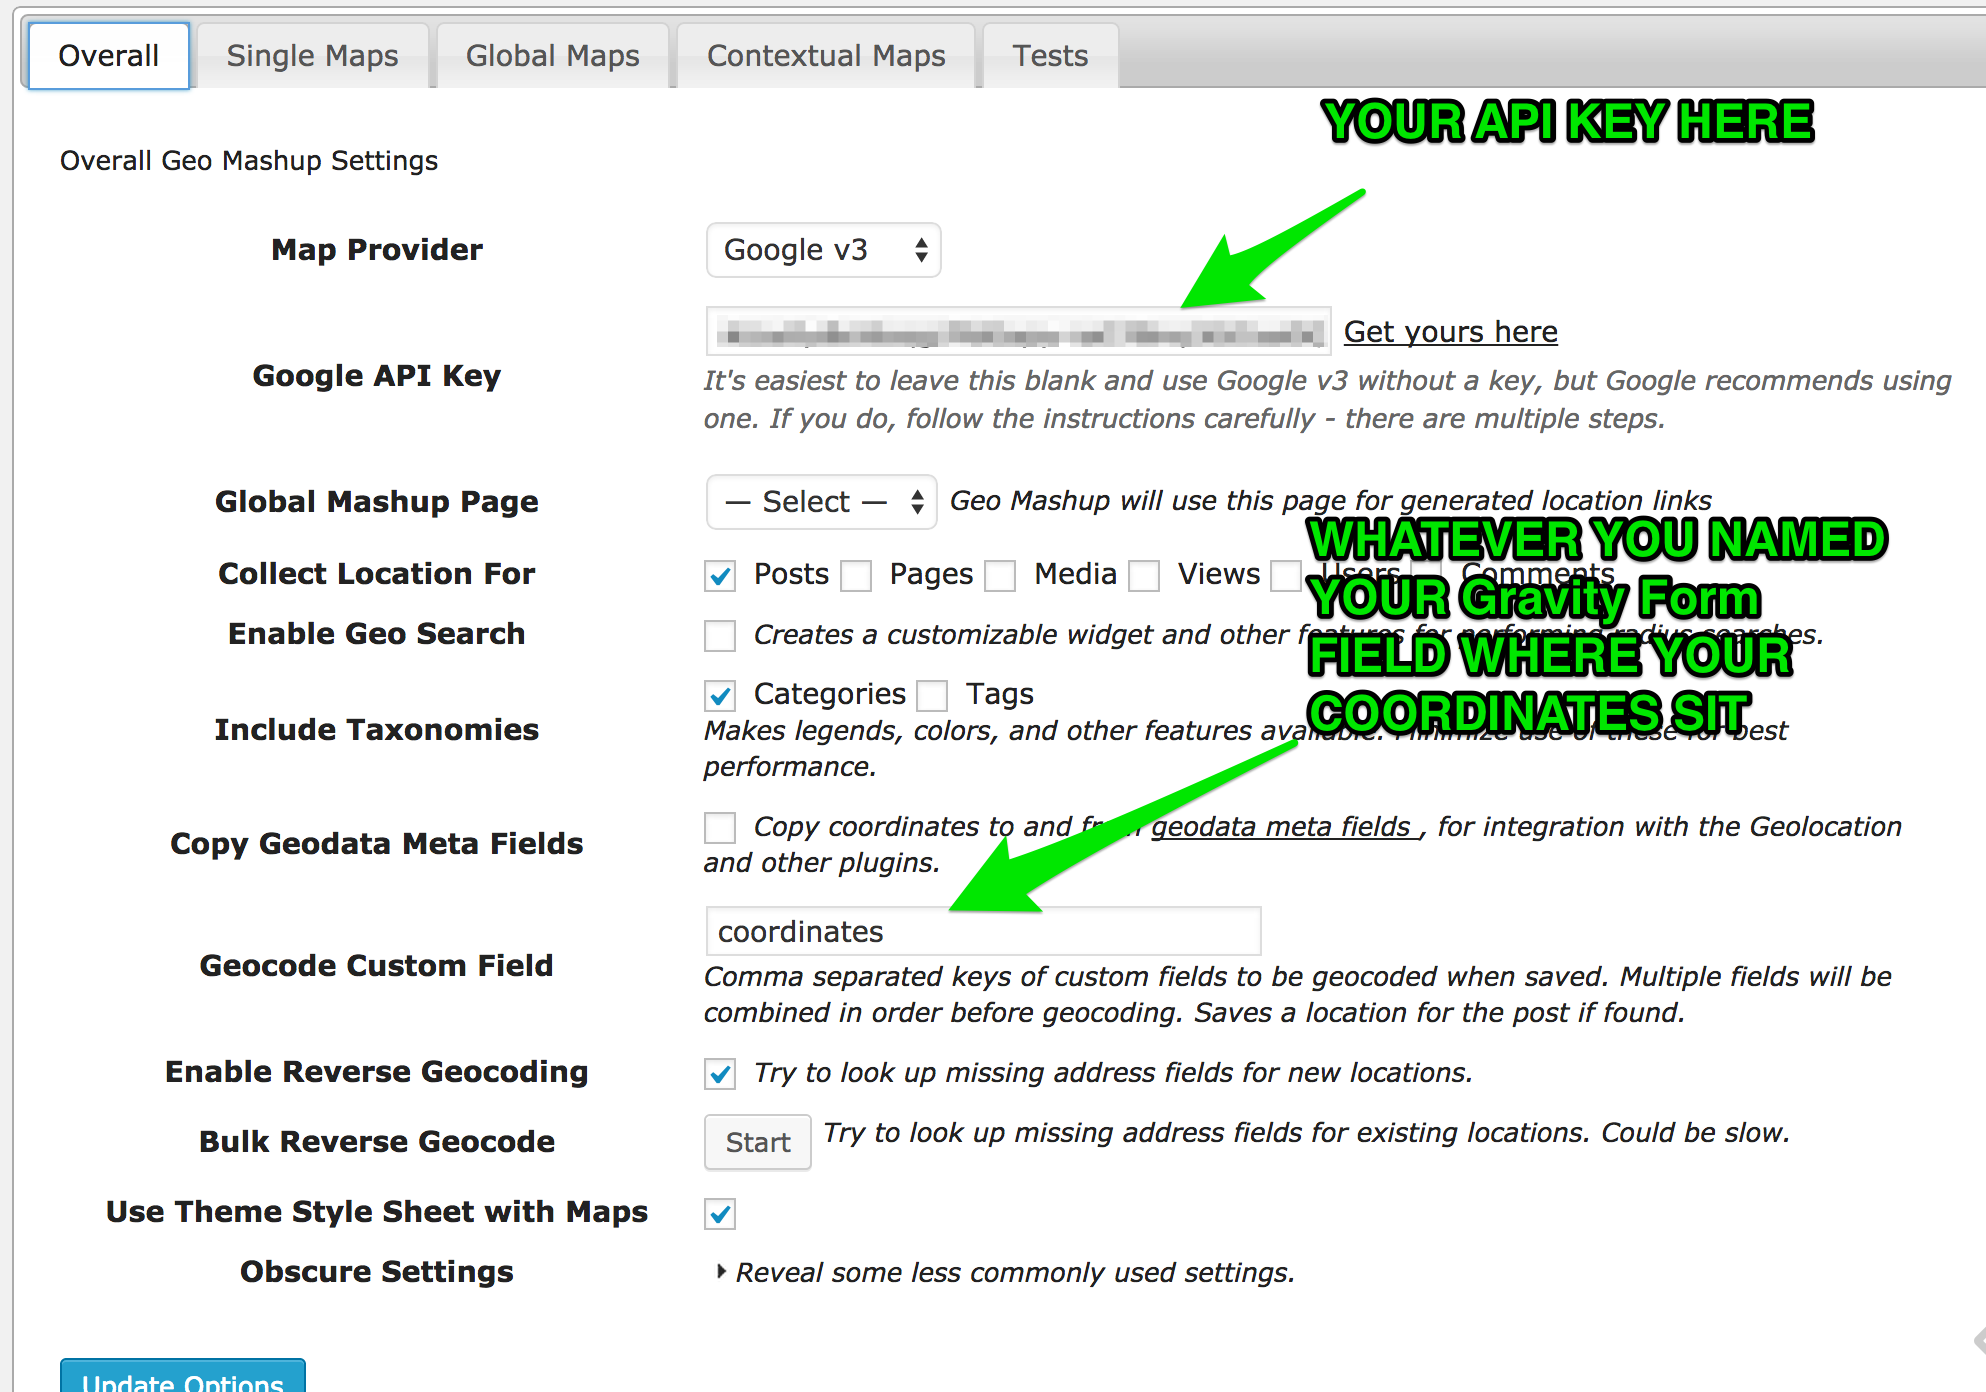
To make this work you do need a Google Maps API3 key and on the WordPress side you’ll need the Gravity Forms (Costs money but worth it) and Geo Mashup (free) plugins. Gravity Forms will let you create posts via a form and provision form elements via URL parameters. Geo Mashup is the friendliest way I found to display posts on a Google Map based on lat/long parameters associated with the post.
Auto Locate
I went to a few different places for this but ended up finding/using the handy example posted in the Google Maps API documentation. It took me a while to get there- “geolocation” is the key term. Add it to your terminology dictionary.
Draggable/Adjustable
So now I needed to figure out a few additional things. The example created an info window rather than a marker so I needed to change that. I also needed to make the marker draggable.
When I looked at the code more closely, things looked possible for someone of my limited skill set.
The original chunk that makes the info window looks like this
var infowindow = new google.maps.InfoWindow
So looking at the API, I found the marker information and changed it to the line below.
var marker = new google.maps.Marker
I changed the variable name (the var part) to help me keep things straight but I could have left it alone.4 Just make sure you change all instances of that variable. I tend to do a find/replace.
By changing to a marker, you have a new set of variables to use. Notice that draggable is one and I set it to ‘true’. The other stuff formats the icon. If you are setting multiple things per item, you need to use the curly brackets- I think of it like a subclause.
draggable: true,
icon: {
	  path: google.maps.SymbolPath.BACKWARD_CLOSED_ARROW,
	  scale: 10,
	  strokeColor: '#FF0000'
		},
So that worked. It took a while but it worked. I then realized, I didn’t quite know how to get the location data out.
Getting the Lat/Long Data Out
document.getElementById("latbox").innerHTML=marker.getPosition().lat();
document.getElementById("longbox").innerHTML=marker.getPosition().lng();
		  var laturl=marker.getPosition().lat();
		  var lngurl=marker.getPosition().lng();
		  var linkurl=baseurl.concat(laturl,comma,lngurl);
		  document.getElementById("linkurl").href=linkurl;
This chunk focuses on getting the lat/long of the initial point and puts them in the latbox and longbox in the page. I did this mainly for testing so I could make sure the code was working. If you left off the .lat() and/or .lng() piece, it’d pull the lat/long as one piece and you could get rid of half the code.
Lines three and four just assign the data to some variables so I could use it to make a URL that provisions a form. Line five makes it into a URL and line six adds the link to the button in the webpage.
This data does not update on drag. You need a LISTENER. They listen to changes in things. You’ll see virtually the same code as above with the addition of the listener function in the first line.
google.maps.event.addListener(marker, "drag", function(){	document.getElementById("latbox").innerHTML=marker.getPosition().lat();
document.getElementById("longbox").innerHTML=marker.getPosition().lng();
		var laturl=marker.getPosition().lat();
		var lngurl=marker.getPosition().lng();
		var linkurl=baseurl.concat(laturl,comma,lngurl);
		document.getElementById("linkurl").href=linkurl;
So at this point, we can complete goals one and two. We can then add the lat/long data to a URL piece. That’s what’s happening in the last two lines of both of the chunks above. It makes a URL that looks something like
http://augmenting.me/geo/report/?coordinates=37.5473032,%20-77.4544755
The first portion http://augmenting.me/geo/report/ takes you to the page where the form is. The second piece ?coordinates= starts with a question mark to indicate it’s a query string and then coordinates identifies the form field you want to populate. We want to fill this field with the lat/long coordinates which are generated via the concatenation of the two variables.5
The Gravity Forms Portion
There’s a bit more detail on provisioning form fields via URL over here.


This pieces is just letting the Geo Mashup plugin know where we’re storing the lat/long coordinates. You can use already associated fields or make a new one and name it whatever works for you.
Another thing I did which helped make this a bit more interesting was to setup some custom CSS/div associations for the Gravity Form responses (below). I then just added those as responses like so . . .
<div class="excellent">0 JTU</div>
Nothing fancy but it added a color element that helped reinforce the good/bad associations. It had the added benefit of being reflected in the Gravity Views layout.6
.excellent {
	background-color: green;
	padding: 5px;
	display: block;
	color: white;
}

.good {
	background-color: #33CC00;
	padding: 5px;
	display: block;
	color: white;
}

.ok {
	background-color: #D0D0D0;
	padding: 5px;
	display: block;
}

.bad {
	background-color: red;
	padding: 5px;
	display: block;
	color: white;
}
Geo Mashup
I tried at least six geolocation plugins. I ended up going with Geo Mashup which is free. They have a fairly active Google Discussion group. It seems to have some rough edges but worked well for what I wanted (show all posts on one map and avoid creating custom post types) and I intend to mess with it a bit more in the future. It does require your Google Maps API7 key in order to function.
Below is the entire html/js/css page that makes the map lat/long picking page. It’s commented semi-decently and hopefully this post makes it more understandable.
https://gist.github.com/woodwardtw/186b8633df8583d86f36
1 The goal elements expand once I get into the details as usually happens.
2 I did look at Leaflet and a few other options . . . but found Google to be the easiest path.
3 See here for more API evangelism
4 Neither honey badgers nor JS care.
5 Three really. I set the comma and space as a variable as well. There’s almost definitely a cleaner way to do this but it works.
6 Paid plugin but a useful one for certain scenarios.
One thought on “Geo Tagging WordPress”
Comments are closed.